Sunday 29 May 2016

Ramadan Meal Planner

Ramadan has always hold a special place in my heart. I love that everyone makes effort to gather and have sahur and iftar together. However as working mother of 2 amazing children, I can get pretty disorganised. I have to admit that there were times (though very rarely) that we end up eating instant noodles cos I simply had no energy to prepare a decent or worst no idea what to cook.This year, I am very determined to be slightly more organised and it starts with a DIY Ramadan Meal Planner.
      
I made these myself using Microsoft Words. Although I really wish that I am able to use something fancier, with my limited skills (and money), this will have to do. The chevron design which I used was down loaded from Two magical Moms blog. They have got lots of pretty colours to choose from, and there are free by the way. So let your creativity run Wild! 

I saw quite a few of free downloadable Ramadan Meal Planner online. However they contained too much columns to my liking. So I customise to my needs. I have also included shopping list section to fill what I need to buy. For the menu, I find it easier to plan when I have match the type of cuisine to the days.
  • Monday: Chinese 
  • Tuesday: Western
  • Wednesday: Malay
  • Thursday: Indian
  • Friday: Western/Malay
  • Saturday: Iftar with family
  • Sunday: Free style
Staying in Singapore has exposed me to many different types of food. I love all of them! Enough of this lengthy post, click here if you want to download the template that I did. It's in PDF. I usually just fill the pdf from my super fabulous Samsung Note 5 and store them as ebook. Super handy!

Till next time.

LittleMom

Thursday 22 May 2014

Hand towel Lollypop ~ No Sew

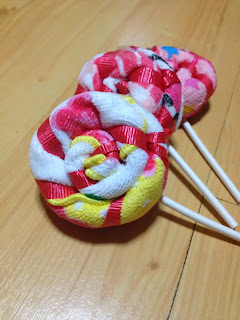
Little Irfan is turning one this Friday. How time flies. I gave birth to him on a Friday afternoon unexpectedly. Well at least the c-sea was unexpected lol. Anyway, I was planning to give goodie bags for his infant care classmates and I was not so sure about giving junks so tiny people. Actually I've never given sweets for my daughter's birthday goodie bags as well. It's just that I don't quite like my daughter bringing home those sweets from her childcare centre anyway, so I try to give other things that I feel are more worth giving. So I made hand towel Lollies hehe.
Pretty right? I made them all under an hour. So here are the things I needed:

1. Cello Tape
2. A roll of Ribbon (I used those for tying cake box cos they are cheap and they are easy to handle) I bought from Phoon Huat.
3. Scissors
4.Good Quality Hand towel
5. Lolly Sticks (I bought from Phoon Huat)

Step 1: Roll the Hand Towel


Step 2: Tie a knot at the end of the towel twirl around the length of the rolled towel at a 45 degree angle, tie a knot at the other end. Roll like a wheel.


Step 3: Insert a lollypop stick through the ribbon. The friction should prevent it from sliding down.


Tadaa. Done less than 20min :)

(This post was written way back in January, but me the queen of procrastinating left it unpublished till 5 months later. Haiz)

Hope this helps.

XOXO

Breast pumping Station at work

Without realising, I've been breastfeeding my Irfan for 16 months and still going strong. I really wanted to share my journey with fellow mummies and hope that some might be able to benefit from my experiences. Though I had tons of things to blog on my mind, I end up not doing so just cos I am a procrastinator. Really really bad. So here I am Five months after my first posting, writing out my second one. As promised this post is about how I set up my pumping station at work.

When I had my first daughter, I think too much about everything. Conscious of people knowing that I am expressing blah blah blah. So I had to make my way to the Health Centre at my work place to express my milk. Each "trip" would take me about 30-40 min in all to and fro. I used a double pump and I pumped for 15 min more or less. The rest of the time is taken up by washing up, sterilization and my walk to and fro the centre. Cos this was too time consuming, I could only afford one pumping session per day and just two months after i went back to work, I had to supplement my daughter with one formula a day and the rest either expressed breast milk (ebm) or direct latch (dl). People are just not happy that I am not at my seat for 30 min outside lunch time. I don't blame them really. Anyway, when I had my second one, I began planning in my mind how I was going to achieve full breastmilk feeding. I needed to pump at least 3 times a day at work to ensure sufficient supply. I need to pump at my desk. With my nursing cover of course!!! So when I came back to work after 4 months I did the most important thing; set up my pumping station and schedule.


Firstly I bought a tier shelve (the white coloured shelf below my document tray) from Daiso. These are stackable but I just use one. Below that shelf is where I keep my brestfriend :).

My pink baby sitting in the centre

Impulse Sealer for sealing my milk bags (I used Playtex standard Liners)

A simple weaved basket bought from Daiso to contain my milk bags.


Really simple everything just where I need them. Just in case you are wondering about Playtex liners and impulse sealers, I am through with those expensive ziplock milk bags. The impulse Sealer cost me SGD$35 from Haig Road and Playtex Liners cost SGD$12 for 120 pieces for 236ml. They are so cheap that I don't need to pack so much in one packet. I could just pack enough for one feed. Throughout my Breastfeeding Journey with No.2, I've only bought 4 boxes. I looove them so much. They are pre sterilised, ideal for breastmilk storage just that there's no sealer. That's when the impulse sealer comes in handy. All all these can be used beyond breastfeeding days. I packed premeasured formula milk for my daughter in the smaller playtex bags (118ml), sealed them, ready for our long holidays. Hmm how bout sealing those half eaten prawn crakers...

 Nope you are not seeing the wrong thing. I really just use a laundry bag to air dry my breast pump essentials. Hehe take a peep in the bag. I bought the bag from Daiso as well. I just used a wall hook and attached it to the side of my table. Simple and Sweet.

For my breast pumping schedule:

Session One: 08.30-08.45
Session Two: 12.00-12.15
Session Three: 16.00-16.15
It's sure a long blog. I guess I need to do up another posting on how I sterilized my pump accessories. So long. Cross my fingers my nest posting won't be another 5 months.

XOXO

Wednesday 18 December 2013

Breastfeeding experience and UniMom breast pump review

With my two little darlings
When I gave birth to my first child, I thought breastfeeding comes in naturally, easily and beautifully. I had images of looking at my daughter who's drinking heartily from me. Unknown to me at that time, breastfeeding is seriously 99% effort and determination. I had no milk flow for close to two weeks after birth and on top of that, having short nipples is of no help at all. Blistered nipples filled with pus, breast infection 3 times and all the horrible experiences associated with breastfeeding. At this point you might have thought I should have given up totally. Some how I didn't. I fed my daughter for nearly one and a half years and still feeding my son who is going 11 months now.

With my first child, a friend loaned me her dual pump for a year, Ameda Lactaline. It was really good. So if you have the money should really give this a go. Before I gave birth to my son, I knew I need to buy a pump but I don't want to spend so much on a pump. So I search. Google, read blog, forums, amazon reviews and friends reviews. Having used a dual pump before, there's no way I will settle for a single one. Since I fully breastfeed (yes no formula supplement) and work full time, I need to find a heavy duty pump. One that can withstand 3-4 times of pumping everyday. Somehow I discovered Unimom and decided to give it a go despite very few reviews online. On the plus side it only cost S$199 when I bought it.
My Own UniMom Forte # (See one bottle doesn't seem to contain much milk. That's because I have super short nipple of my right and my baby prefers my left. Thus more milk on the left)

Prior to Unimom Forte # I bought Unimom Forte as the newer model was not available in Singapore than. Less than one month later mothercare brought in the newer model :(. Pretty upset but I had to admit Unimom Forte was good enough. It definitely helped me through my Maternity Leave days both to establish and build up milk supply. However it was really big, heavy and noisy. After 5 good months, I bought the Unimom Forte # at S$199. I definitely prefer the improved Unimom Forte #. My colleague who sat next to me was most happy as she no longer felt like she's sitting in an ICU ward 3 times a day. Seriously despite all the good points, Unimom Forte was too noisy. Now, no one really notice when I am expressing at my desk. If you ask me how good is Unimom Forte # which now retails at S$299, I'll say as good as Ameda retail at S$399. I know this is a pretty long post, I'll definitely write another one on how I set up my desktop as pumping station. Hope my experience will help someone out there.
PS: If you ever wonder what happens to my unimom forte, I used it at home when I am on leave as my son goes to full day infant care.
Till next time.XOXO